Code + AI 101 // BrXnd Dispatch vol. 015
On Airtable, GPT3, and the magic of code + AI.
You’re getting this email as a subscriber to the BrXnd Dispatch, a (roughly) bi-weekly email at the intersection of brands and AI. On May 16th, we’re holding the BrXnd Marketing X AI Conference. Early bird tickets are 20% off until 4/1. If you’d like to learn more or sponsor the event, please be in touch.
Over the last few weeks, there has been quite a bit of conversation about code and AI (including a long post I wrote about my experience with GPT4 code assistance). While I know this newsletter is ostensibly about marketing and AI, I thought it might be helpful to write up some primers for those interested in better understanding the nature of these tools, particularly as they relate to code. Given the noise in this world, I’ve made a concerted effort with BrXnd to focus on showing work and experiments rather than pontificating about the tech. Part of that is just me building intuition out loud, and part is an attempt to separate my work from the broader space.
Anyway, let’s talk about getting started with code and AI. I will probably go much deeper into this in the future and may even turn this into a course if there’s enough interest, but for now, I will cover how to use Airtable to interact with AI APIs from OpenAI.
Airtable is one of my very favorite ways to prototype ideas and works particularly well for playing with APIs as they have a built-in Typescript editor. For those unfamiliar, Airtable is basically a database not unlike PostgreSQL or MySQL, but it has a simple frontend resemblant to Excel or Google Sheets. The real power comes when combined with Automations, which, if you’re on the $20-per-month pro plan, includes the ability to write almost any Javascript/Typescript that interacts with your base. The magic of Airtable as a prototyping tool is that your database and code can all live in the same place, and thanks to Automations, Views, and some other niceties, you can build some pretty complex stuff with very little code and no worries about setting up your environment—which is the bane of the amateur coder's existence. (For context, most of my BrXnd Collabs tool runs on Airtable to this day.)
Anyway, for the sake of explanation, let’s spin up a new base and generate some blog posts. I have a super simple table with four columns:
Title: Single Line Text
Additional Context: Long Text
Blog Post: Long Text (Rich Formatting)
Send to GPT: Checkbox
The basic idea is that we will write our post titles and offer a bit of additional context about what we want out of the post. When we’ve added everything we need, we will use the Send to GPT checkbox to trigger everything. From there, once we set everything up, OpenAI will generate a post and it will be added to the Blog Post column.
After the basic setup of our Base, let’s create a new view called Send to GPT. Views allow you to filter the information in a base as determined by the content. This is particularly useful for Automations, which can be triggered when a new item enters a view. You set these up with filters.
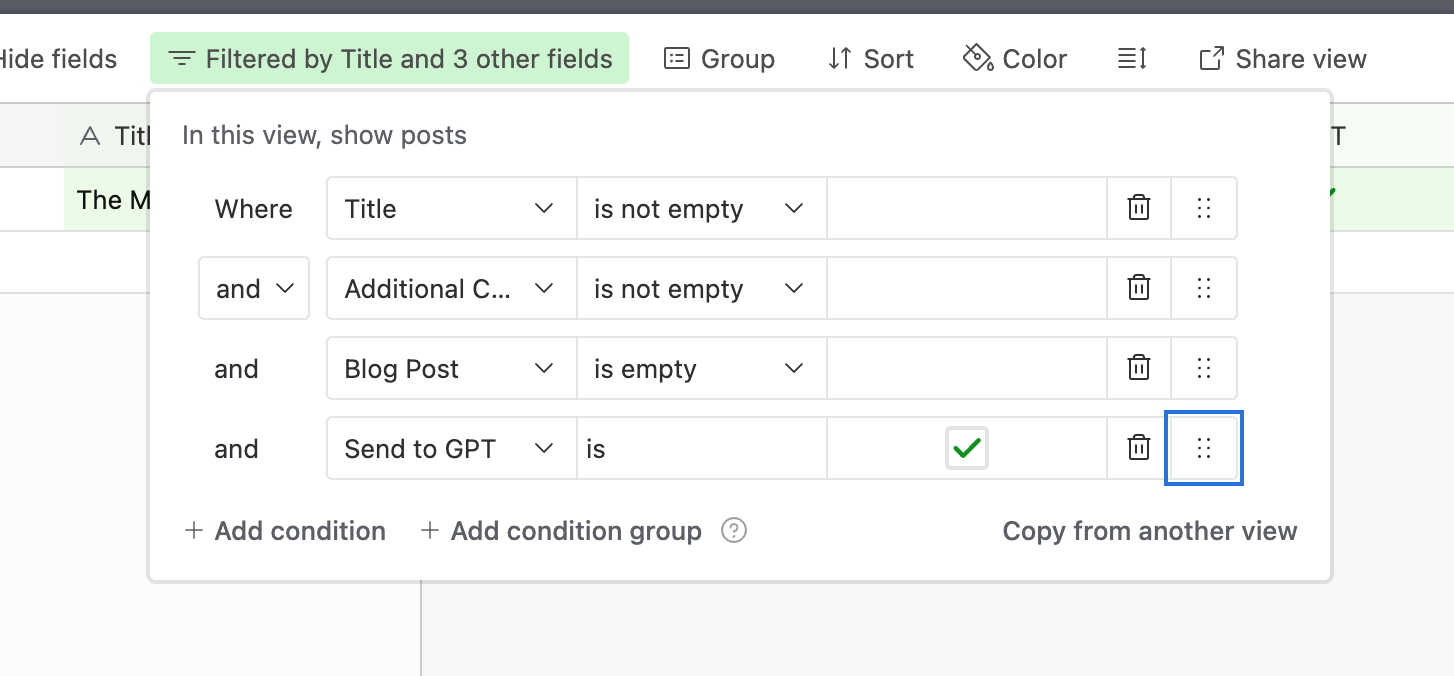
We will set the filters up for our Send to GPT view to ensure we have a title, additional context, and the Send to GPT checkbox is checked. In addition, we want to ensure our Blog Post field is empty, as we won’t want to regenerate posts we’ve already created.
Assuming you haven’t added anything to the Base yet, this view should be empty. That’s good! It’s all working. Now let’s quickly add a post to test with. Once you add a Title and Description, check the “Send to GPT” checkbox. (I have an example below, but you can do whatever you want.)
Now if we go back to our Send to GPT view on the left, we should see our new post there. That’s what we want. Now, head over to Automations in the top nav, and let’s start setting things up to send and receive data from the GPT3 API. I’m sticking with that for now as it’s a bit simpler than 3.5, which has a different format optimized for chat—but if you want to make the transition, it shouldn’t be too big a deal, and most of this code should just work.
Reminder: You must have a Pro account to do what comes next. If you don’t have a Pro account, you can sign up for one with my referral code, and I’ll get some Airtable credits. Once we’re in Automations, you need to:
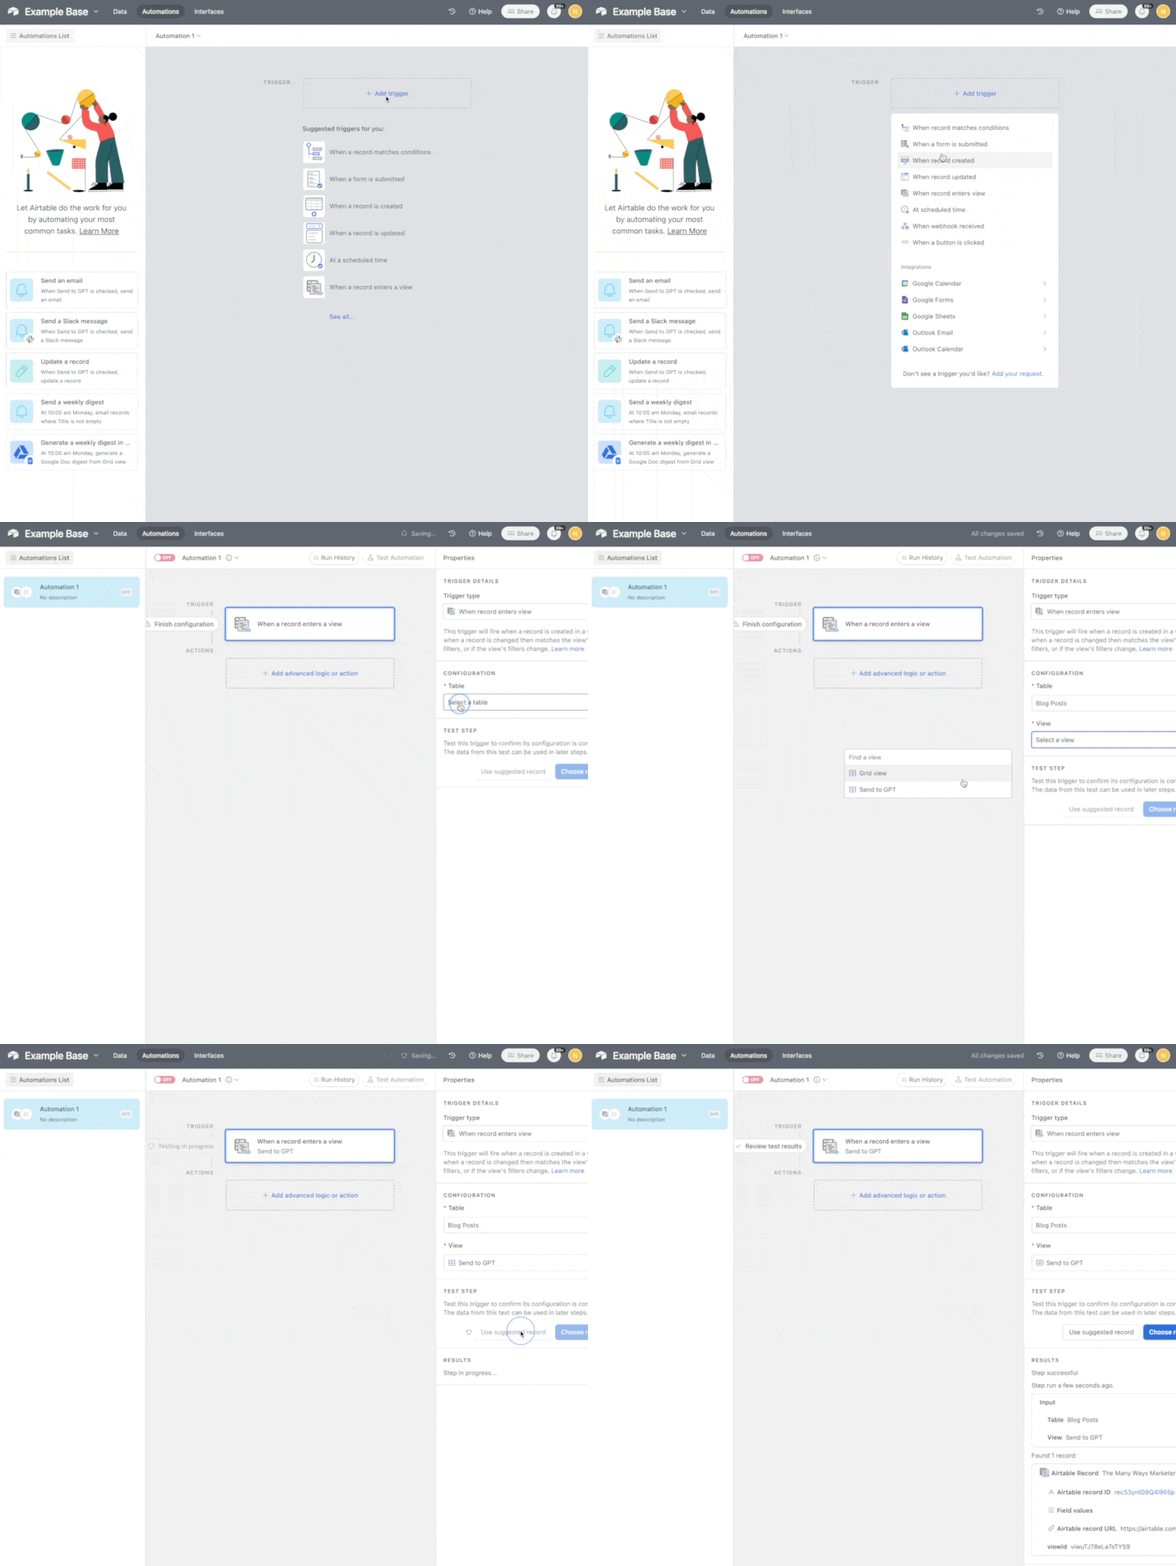
Click Add Trigger
Choose Blog Posts as the Table
Choose Send to GPT as the View
That means that each time an item enters the Send to GPT View (which tells us it has a title, context, the send to GPT box is checked, and it has no blog post yet), it will trigger this automation to run. So if you’re wondering where the AI comes in, we’re finally there.
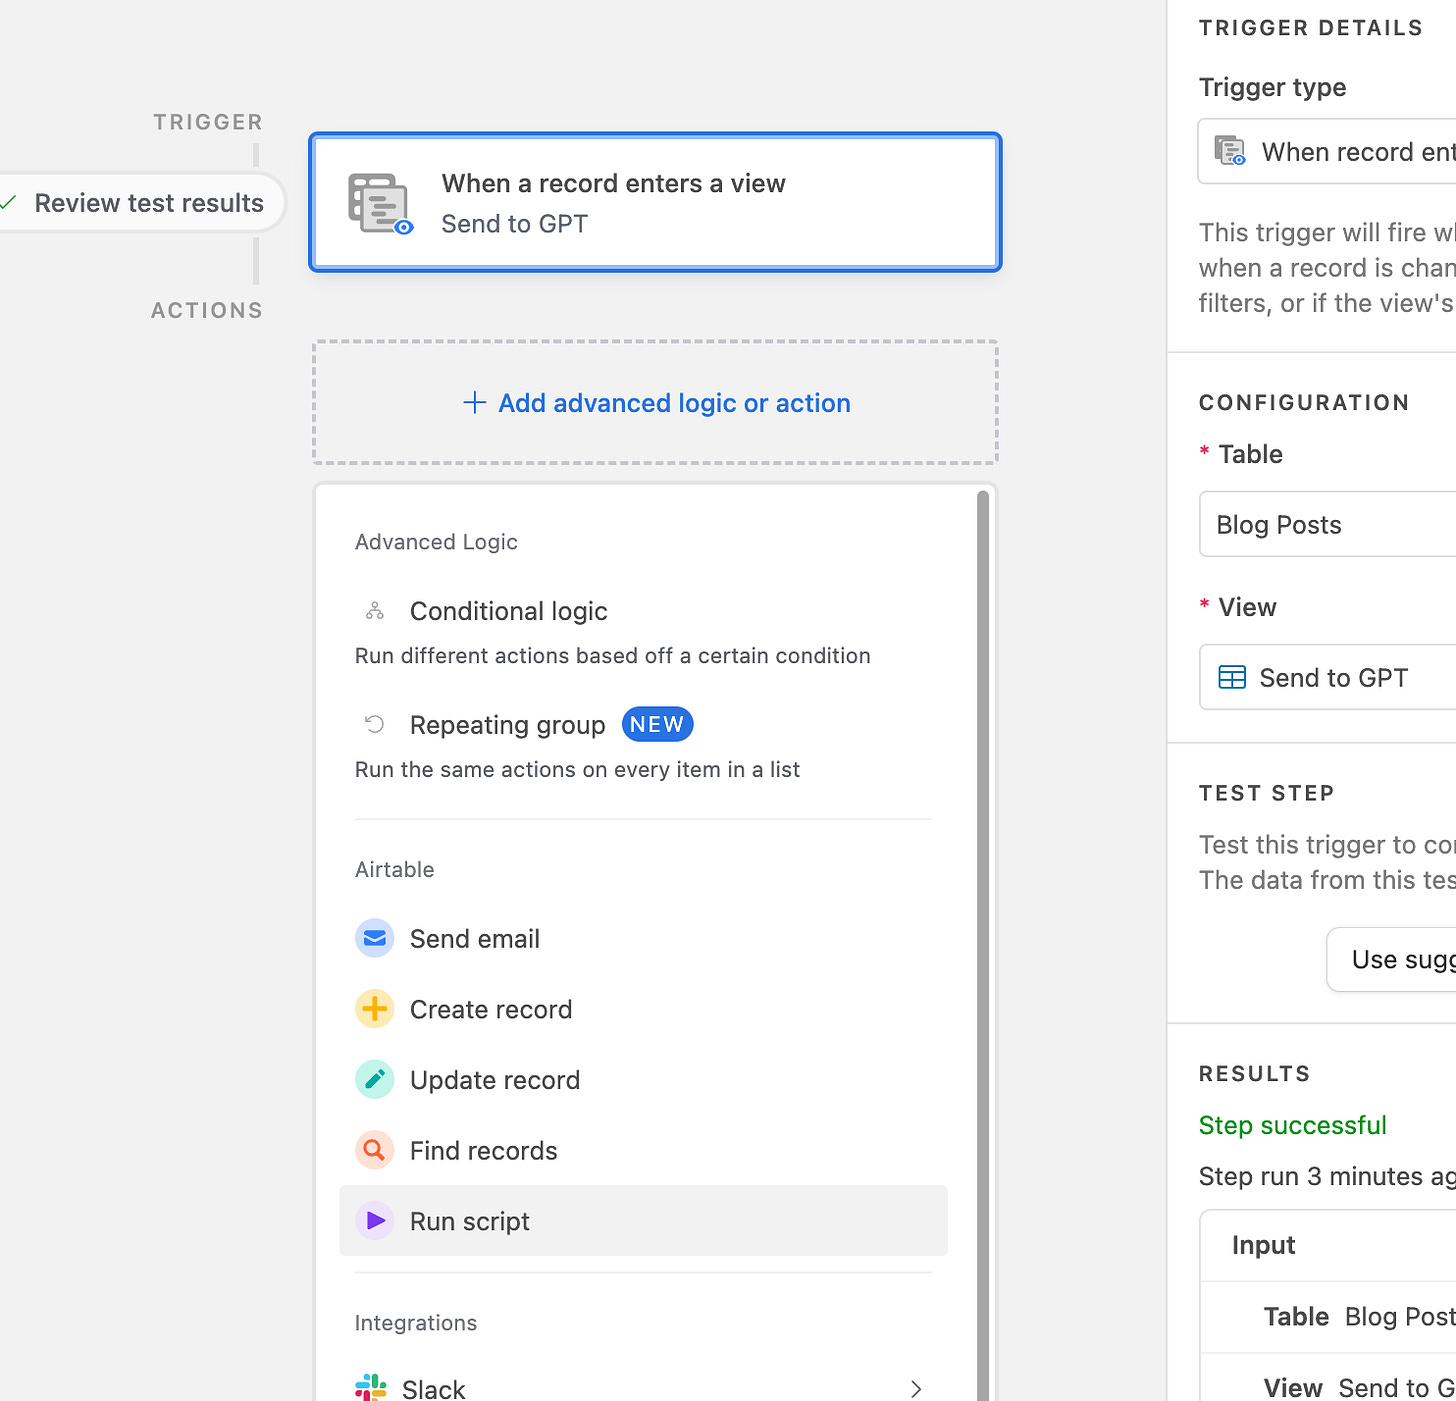
Next, click Add Advanced Logic or Action and choose Run Script.
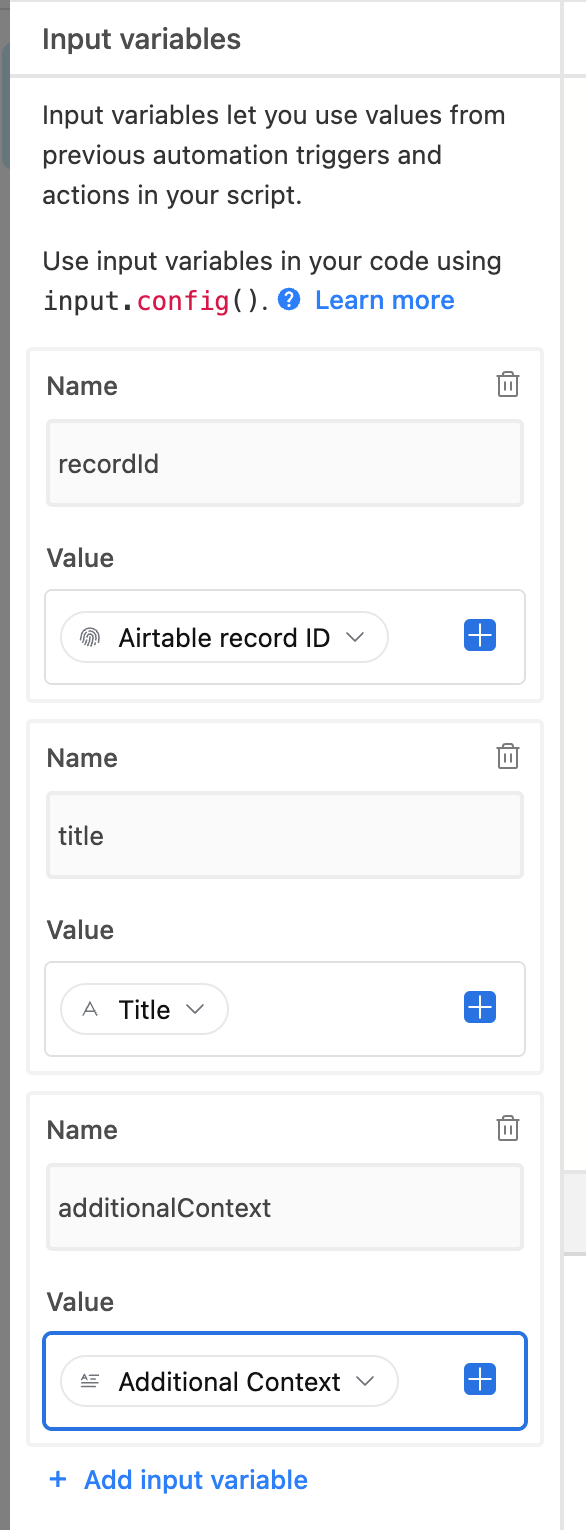
This will give us the coding interface we can use to call GPT3. When you click it, you should open up an Edit Script screen. The left side is “Input Variables,” which determines which fields from the item that triggered the automation we want to pass into our script. For our purposes, we want three things:
The Record ID (we’ll use this to update the record with our AI blog post)
Title
Additional Context
You need to name each of these. I usually go with the standard casing in Javascript, but you can use whatever you want.
Now it’s time for code. Below is everything you need, with comments on what each line does. One important note: you will also need a paid account for OpenAI. Using their API is not free, and you should understand the costs. It’s pretty cheap to call the API being used here ($0.02 per 1,000 tokens), but it can add up. You can sign up for an account at platform.openai.com (I believe it comes with some free credits, but I have long since spent them and don’t remember).
For our purposes, I wrote a super simple prompt. This is a great thing to play around with (I highly recommend experimenting with the OpenAI Playground once you have an account). Our prompt looks roughly like this (replacing <TITLE> and <ADDITIONALCONTEXT> with what we pass into the code.
Using the following title and context, write a blog post.
Title: <TITLE>
Context: <ADDITIONALCONTEXT>
Blog Post:
Next, we pass that into a body object that has a bunch of other stuff required by the API:
Model designates which of the models offered by OpenAI we are using. Different models have different strengths and pricing.
Prompt is our prompt (we’ve defined it previously in our code which you'll see below)
Temperature is a value between 0 and 2. Per the docs, “Higher values like 0.8 will make the output more random, while lower values like 0.2 will make it more focused and deterministic.”
Max Tokens says how many tokens we want to use. I maxed it out to 4,000 here, though that could cost us 8 cents if all of them are used (which they almost definitely won’t be).
Top P, Frequency, and Presence are all things you can read about in the docs, but you probably won’t need to mess with much.
One last thing you’ll need to make everything work is an OpenAI API key. Once you sign up, you can generate one easily. Make sure you store the key securely, as you won’t be able to see it again after it’s initially generated.
Now, for what you’ve been waiting for, here’s all the code to paste in. One quick note: if you named your inputs or columns anything different, you would need to change the format. Also, critically, in the line that says 'Authorization': 'Bearer TOKEN'’ replace TOKEN with your OpenAI API token.
| // First we need to pull our Input Variables into the script | |
| const inputConfig = input.config() | |
| // We need to put our title and description into a prompt. | |
| const prompt = `Using the following title and context, write a blog post.\n\nTitle: ${inputConfig.title}\nContext: ${inputConfig.additionalContext}\n\nBlog Post:` | |
| // Let's format the body of the API call we will make. There is a bunch of stuff in here that OpenAI needs. | |
| const body = { | |
| "model": "text-davinci-003", | |
| "prompt": prompt, | |
| "temperature": 0.7, | |
| "max_tokens": 4000, | |
| "top_p": 1, | |
| "frequency_penalty": 0, | |
| "presence_penalty": 0 | |
| } | |
| // This is where we call the actual API. Make sure you replace TOKEN with your OpenAI API Token. | |
| let response = await fetch('https://api.openai.com/v1/completions', { | |
| method: 'POST', | |
| body: JSON.stringify(body), | |
| headers: { | |
| 'Content-Type': 'application/json', | |
| 'Authorization': 'Bearer TOKEN' | |
| }, | |
| }); | |
| // Make sure the call went through properly | |
| if(response.ok) { | |
| // Grab the JSON body response | |
| const responseBody = await response.json() | |
| // Grab the text completion and trim the whitespace | |
| const blogPost = responseBody.choices[0].text.trim() | |
| // Finally, we are going to insert the finished post back into our table. | |
| const table = base.getTable("Blog Posts") | |
| await table.updateRecordAsync(inputConfig.recordId, {"Blog Post": blogPost}) | |
| console.log("Successfully Added Post") | |
| } else { | |
| console.log('Error') | |
| console.log(await response.json()) | |
| } |
From there, hit Test, and you should see “Successfully Added Post.” That means it worked. Once you’re done with that, hit Finish Editing, and then make sure you turn your automation on.
Now simply head back, add more titles and additional context and click the “Send to GPT Checkbox,” and watch your new blog posts pour in. Have fun, experiment with the prompts, and feel free to reply or comment with questions. You can also always join the BrXnd Discord to discuss.
There are only a few days left to lock in 20% off savings for the BrXnd Marketing X AI Conference on May 16th in NYC. Get your tickets now.
Thanks for reading.
— Noah


